Make print-ready PDFs
Set up your PDF print-ready files correctly to save time, money and effort. Ensuring details like your files have the appropriate colour mode, resolution and are the correct size will help speed things up. We take a no-detail-spared approach to print, and our print file setup checklist will ensure you miss nothing.
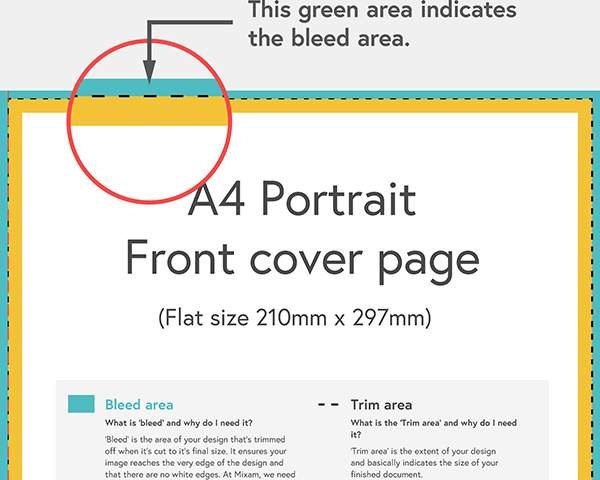
Our FREE PDF Templates - complete with fold lines, trim lines, bleed, and quiet areas - have their own simple explanation underneath. You can find templates on the lower left-hand side of our product pages.

Interior page setup
Picture your final print. How will you print it? How will your specifications affect your design? Questions like these will help you organise your pages and artwork accordingly. To set up internal pages for a multi-page item, like a Hardcover Book or Magazine, follow these steps:
1. Choose single or double-page spreads
For Adobe InDesign users - files will be automatically set up as double-page spreads. But you can change to single pages by going to Document > Set Up - and deselecting the option for Facing Pages. And for Illustrator or Photoshop users, you can set your canvas or artboard to single or double pages.
2. Add bleed and quiet areas
Add 3mm bleed regardless of size, and allocate a 5mm quiet area along the edges of your design (no content should be in this area whatsoever). These areas will prevent any content from being cut away before being bound.
Next, extend the content that touches the trim edge beyond the bleed area.
In Adobe programs, you can use our templates to help you see the correct margins and quiet areas. You will also need to increase the canvas size by 5mm to accommodate bleed on all sides.
InDesign users can select Use Document Bleeds in the Export PDF dialogue box.
3. Set up your margins
If you want to print a single-page Flyer or staple-bound Booklet, your margin measurements can be the same for your quiet area. However, for perfect bound, wiro bound, or Hardcover Book designs, you will need to allow extra space on the inside margins - so no content is lost during trimming.
Please ensure text is at least 5mm from the trim edge, as up to 6mm can get hidden when bound. We recommend a 12mm margin on the binding edge and 15mm for Wiro items to ensure no text is hidden or obscured.
4. Preparing for Output
Before outputting your file, follow our complete checklist to ensure the images and format are the correct sizes. If you want to output as a single page document, you can switch from facing pages to single pages in InDesign, but this may require some reformatting to ensure all the elements are in the bleed areas.
When outputting, ensure you select the correct page range, deselect Spreads, and output your file as a High Quality or Press Quality PDF with bleed marks set as On.
InDesign users will need to select Use Document Bleeds in the Export PDF dialogue box.


Double spreads
Double page spreads hold so much creative potential for multi-page items. You could even expand your designs across two pages, suitable for prints like Lookbooks. Follow our step-by-step guide to setting up your double-page spreads:
1. Set your files to double pages
In Adobe InDesign, by default, your file will have facing pages. In other words, Page One (your cover) will be automatically on the right-hand side. Subsequent pages will appear side by side in the Pages palette.
If you create your pages in Illustrator or Photoshop, you have to ensure your canvas or artboard size is equivalent to double your trim size. For example, if your book is A4, you need to create a canvas that is 420mm wide (i.e. 2mm x 210mm).
2. Add bleed and quiet area.
Add a 3mm bleed regardless of size, and allocate a 5mm quiet area along the edges of your design. These areas will prevent any content from being cut away in the trimming process before being bound.
Next, the content that touches the trim edge must extend beyond the bleed area.
In Photoshop or Illustrator, you can use our templates to help you see the correct margins and quiet areas. You will also need to increase the canvas size by 5mm to accommodate bleed on all sides.
InDesign users can select Use Document Bleeds in the Export PDF dialogue box.

3. Ensure your design works as a spread
Align your elements to prevent any detail from becoming lost in the inside margins. Words that run across should have spaces added - and images offset, so neither falls into the gutter.
To offset an image in InDesign:
- Split your images into separate frames into separate pages (not a single frame running across both pages).
- Move the left-hand image to the left by 3mm and the right-hand side image to the right by 3mm.
- Then adjust the frame to fill the pages and bleed correctly.
This method will create an area in the middle of the page that makes the image look duplicated. But it will not be visible when printed.
With both image offsetting and text formatting, it might not look ideal on your artwork on your computer. But when printed and bound into a book, it will be accurate.
4. Exporting files as spreads
If you export your file as spreads in InDesign, select Spreads in the Export panel. When uploading your file to our online platform, our software will split the pages for you.
Although they will appear as single pages in the Artwork Dashboard, the files sent to the printer will keep their alignment.

Cover setup
Your cover design will depend on the binding you choose. Page 1 on a folded, multi-sided or multi-page item will be your cover. Our software will do the rest automatically.
If you plan to print a Hardcover Book, you need to supply separate cover files. You can upload the Front and Back covers as individual pages with a separate spine file - or a single file with the integrated spine.
1. Creating a cover file
Remember the artwork will wrap around the bound edge, and it is always on the left. So during the artwork setup, note that the front cover is on the right-hand side, and the back cover is on the left.
If creating a new file from scratch, it will need to be twice the trim size, with space allocated for a spine. For example, if you have an A4 Book with a 5mm spine, it will be (210mm x 2) + 5mm = 425mm wide.
2. Calculating your spine width
Mixam automatically calculates the spine width when you create a quote. We calculate the spine width on the number of pages you enter into the Instant Price Calculator and the chosen paper weight. You will find the required spine size in your Artwork Dashboard once you have clicked on the Add to Cart option, and you can review your final specifications.
3. Special features
Stand out from the competition, give your prints a premium look, and make a lasting impression - special features truly elevate your print work. Whether you add a Spot UV finish or Spot Colour to your cover, you only need to provide a same-size, second file of your main cover file with the areas marked out by a single colour.
Printing Fonts
For optimum print quality, choose a print-compatible font. Web fonts are optimised for digital display only and may cause issues that won't be visible in your virtual Preview and Downloadable Proof.
To preserve a font's appearance, you can convert web fonts (text) to outlines (artwork, shapes) in your PDF. Check your text post-outlining to ensure all characters appear accurately. Here's how to convert web fonts to outlines in Adobe for print:
InDesign
- Use the 'Type' tool to select all the text in your file.
- Type > Create Outlines
- Click File > Save As and give your file a new name to avoid saving over the editable version.
Illustrator
- Click Command + A to select all text in your file.
- Click Command + Shift + O with the fonts selected.
- Click File > Save As and give your file a new name to avoid saving over the editable version.
Photoshop
- Right-click or use Command on the text layer in the Layers panel.
- Select 'Convert To Shape'.
- Click File > Save As and give your file a new name to avoid saving over the editable version.
For white or lightly coloured text on dark backgrounds, you can prevent text bleed, flood and ghosting with these tips:
- Use fonts larger than 6pt in regular or bold.
- Place text against lighter backgrounds.
Avoid:
- Narrow, small fonts.
- Highly decorative, thin-detailed fonts.
Export Print Files With .joboptions
Adobe program users can optimise files for our presses by downloading Mixam's .joboptions preset files. They 'calibrate' files with our preferred PDF print settings, such as colour space, fonts, transparencies, and printer bleeds. Adding a .joboptions file to one Adobe program will automatically update the other programs. When exporting your files, you don't need to include crop or trim marks. However, Canva users must export files with crop marks and bleed areas included.
First, download and install Mixam's preferred CMYK colour profile for colour consistency:
Now download the relevant .joboptions file below:
If your .joboptions file doesn't load automatically, you can manually install it in Adobe programs (note settings may differ across operating systems and program versions):
InDesign
- File > Adobe PDF Presets > Define
- Select the Mixam .joboptions file and click 'Load'.
- Click Mixam's .joboptions file from the 'Adobe PDF Presets' drop-down list and click 'Load' ('Open' for Windows).
- Select Mixam's .joboptions file in Adobe PDF Presets and click 'Done'.
- To export your files, go to File > Adobe PDF Presets > Mixam .joboptions file > Export.
Illustrator
- Edit > Adobe PDF Presets
- Click Import > Select Mixam's .joboptions file.
- Click 'Load' ('Open' for Windows).
- Select Mixam's .joboptions file in Adobe PDF Presets and click 'OK'.
- To export your files, go to File > Save As... > Save as type: Adobe PDF (*.PDF) Save > Mixam .joboptions file > Save PDF.
Photoshop
- Edit > Adobe PDF Presets
- Click 'Load' > select the Mixam .joboptions file > Click 'Load' ('Open' for Windows).
- Select Mixam's .joboptions file in Adobe PDF Presets and click 'Done'.
- To export your files, go to File > Save As... > Save as type: Photoshop PDF (*.PDF, *PDP) > Save > Mixam .joboptions file > Save PDF.
How to submit your files
Uploading your files to Mixam is easy, plus there's no pressure to buy the items, even after uploading your files.
Once our Instant Price Calculator has given you a quote, click Add to Cart, then Proceed and upload files to begin uploading your work to your Artwork Dashboard.
On the left-hand side of your screen, you will see a note: Please drag your file(s) here or use the button below to upload your artwork. Please note that page order is rearranged every time a file is uploaded. You can drag and drop files from your desktop or submit your files for printing directly from your computer. You can even add them from services like DropBox or WeTransfer.
